HIA Health Agent
Zero to Hero: Building a Medical AI Agent with Google ADK
Introduction
In this tutorial, we will dissect the Health Insights Agent (HIA). This isn't just a script; it's a modular AI system capable of acting like a medical analyst. We built this using Google's Agent Development Kit (ADK).
By the end of this guide, you will understand every single file in the project and how they work together to analyze PDF blood reports.
Project Structure
A robust AI agent is organized like a software project, not a notebook. Here is our file map:
/hia_health_agent/
    ├── __init__.py        # 🚪 Entry Point: Tells ADK "I am here!"
    ├── agent.py           # 🧠 The Brain: Helper agents & Orchestrator
    ├── tools.py           # 🛠️ The Hands: Functions to read PDF & Search
    ├── prompts.py         # 🎭 The Persona: System instructions
    ├── config.py          # ⚙️ The Rules: Constants & settings
    ├── sample_data.py     # 🧪 Test Data: Fake blood report for testing
    ├── .env               # 🔑 Keys: API credentials
    └── run_agent.sh       # 🚀 Launcher: Script to start the Web UI
Step 2: Defining the Rules
Every app needs settings. We keep ours in config.py so we can change them easily without
digging into complex code.
# config.py
# Simple constants to safe-guard our application

MAX_UPLOAD_SIZE_MB = 20    # Don't let users upload massive files
MAX_PDF_PAGES = 50         # Limit processing to avoid blowing up the LLM context
ANALYSIS_DAILY_LIMIT = 15  # Rate limiting (concept)
Step 3: Creating the Persona
An AI model is blank slate. We use System Prompts to give it a role. In `prompts.py`, we define exactly how our medical analyst should behave.
# prompts.py

# This prompt tells the AI it is an EXPERT.
# It also strictly defines the JSON output format we expect.
SPECIALIST_PROMPTS = {
    "comprehensive_analyst": """You are an expert medical analyst...

    Based on the provided blood report, provide a single comprehensive analysis in the following json format.

    - **Potential Health Risks:** ...
    - **Recommendations:** ...
    """
}

# This prompt is for the Q&A agent.
QA_SYSTEM_PROMPT = """You are a helpful medical assistant answering follow-up questions..."""
Step 4: Giving the Agent "Hands"
LLMs can't read files or search the web by default. We create Tools—Python functions that the AI can "call".
Tool 1: PDF Extractor
This tool reads a PDF file path and returns the text. It also caches the text to a file so we can search it later without re-reading the PDF.
# tools.py
import pdfplumber
from .config import MAX_PDF_PAGES

# We save the text here for quick access later
REPORT_CACHE_FILE = "/tmp/hia_last_report.txt"

def extract_pdf_text(file_path: str) -> dict:
    """
    Extracts text from a PDF file and caches it for search.
    Args:
        file_path: The absolute path to the PDF.
    """
    text = ""
    # Open PDF and loop through pages...
    with pdfplumber.open(file_path) as pdf:
        for page in pdf.pages:
            text += page.extract_text() + "\n"

    # Save to cache!
    with open(REPORT_CACHE_FILE, "w") as f:
        f.write(text)

    return {"status": "success", "text": text}
Tool 2: Context Search
When you ask "What is my cholesterol?", the AI uses this tool to find the exact line in the cached report. This is a lightweight version of RAG (Retrieval Augmented Generation).
# tools.py (continued)

def search_report_context(query: str) -> dict:
    """
    Searches for keywords in the last analyzed report.
    """
    # Read the cache file we created earlier
    with open(REPORT_CACHE_FILE, "r") as f:
        content = f.read()

    # Find lines matching the query...
    results = [line for line in content.split('\n') if query.lower() in line.lower()]

    return {"status": "success", "context": "\n".join(results)}
Step 5: The Brain (Orchestration)
This is where we assemble everything. We use the Orchestrator-Workers pattern.
- Worker 1 (Analyst): Has the PDF tool. Reads & Diagnoses.
- Worker 2 (Chat): Has the Search tool. Answers questions.
- Orchestrator (Root): Decides which worker to call based on user input.
# agent.py
from google.adk.agents import LlmAgent
from .tools import extract_pdf_text, search_report_context
from .prompts import SPECIALIST_PROMPTS, QA_SYSTEM_PROMPT

# --- WORKER 1: The Analyst ---
report_analyst = LlmAgent(
    name="report_analyst",
    model="gemini-2.0-flash",
    instruction=SPECIALIST_PROMPTS["comprehensive_analyst"], # Use the persona!
    tools=[extract_pdf_text],  # Give it the PDF tool!
    output_key="last_analysis_result" # Remember the diagnosis
)

# --- WORKER 2: The Chat ---
follow_up_agent = LlmAgent(
    name="follow_up_agent",
    model="gemini-2.0-flash",
    instruction=QA_SYSTEM_PROMPT,
    tools=[search_report_context] # Give it the Search tool!
)

# --- THE BOSS: Root Agent ---
# Notice it has NO tools, only sub_agents.
root_agent = LlmAgent(
    name="hia_health_agent",
    model="gemini-2.0-flash",
    description="Orchestrator for Health Insights.",
    instruction="""
    - User has a file? -> Send to report_analyst.
    - User has a question? -> Send to follow_up_agent.
    """,
    sub_agents=[report_analyst, follow_up_agent]
)
Step 6: Discovery
This tiny file is crucial. It tells the ADK framework "Hey, the agent you are looking for is called
root_agent inside agent.py". Without this, you get "No agents found".
# __init__.py
from .agent import root_agent
Step 7: Launching It
Finally, we need to run it. The trick is that ADK needs to be run from the parent directory to see the agent package correctly.
#!/bin/bash
# run_agent.sh

# 1. CD to the script's directory
cd "$(dirname "$0")"

# 2. CD up one level to the PARENT folder
cd ..

# 3. Tell ADK to serve the agent folder
echo "Starting Web UI..."
adk web hia_health_agent
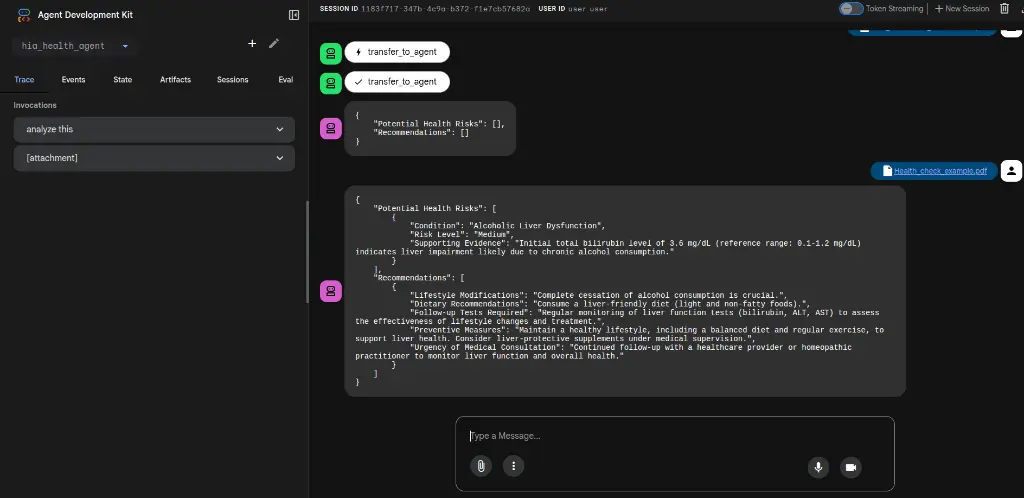
Final Result
When you put it all together, you get a beautiful, functional AI agent capable of complex medical analysis.